When I talk with clients about making photo books the conversation usually goes like this:
Me – “What kind of photo book would you like to make?”
My client – “Well, I’d really like to make a baby album. One for each of my kids. With pictures of their first year and their birthdays. Well, maybe that should be another album. An album for celebrating their birthdays, or each year of their lives. Did I tell you I have 4 kids? Yeah, well, they’re teens now, which is fun, but I miss the younger years. I wish I had a family album for each year as they were growing up – no one has seen those pictures on my phone. Like, ever. And we took a great family trip to Victoria last year, I’d love to be able to share those pictures with everyone! Can we do a book about that?”
We miss sharing photos. Many people start making photo books but most of them are never completed. That’s a lot of work that never makes it to the finish line! Why are we not finishing our books?

The biggest issue is that we’re not starting with a plan. A solid plan makes creating your book so much easier! You know ahead of time what decisions you have to make. You have a starting point and an end point. You know when your book will be done, and you can look forward to hitting that “send to print” button!
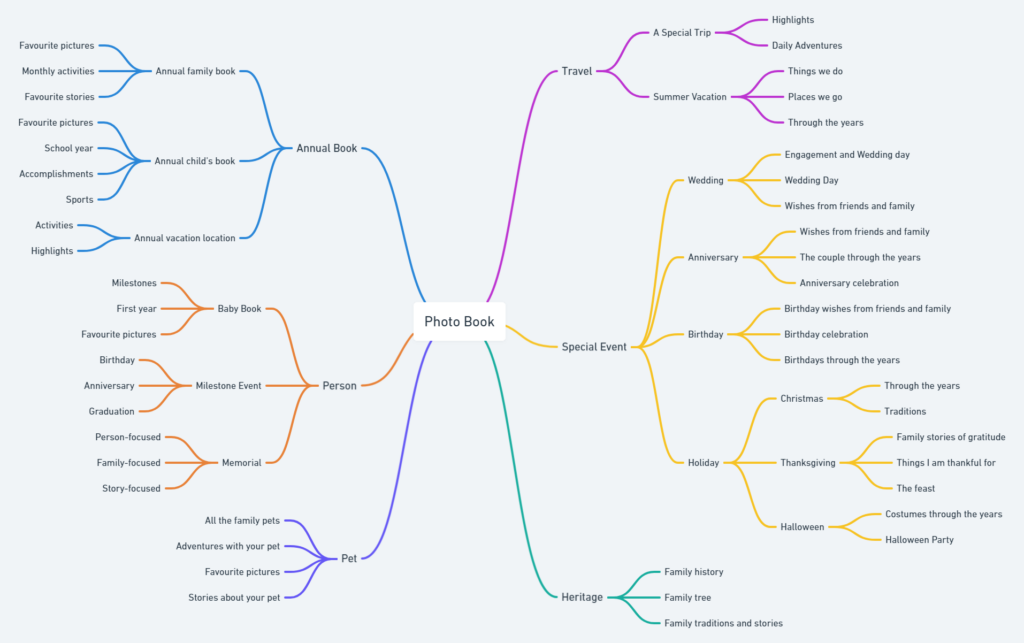
Start with a mind map. You need to get all the ideas out of your head and down on paper. Write Photo Book in the middle of your page then write all the types of photo books you’d like to make around it. Add all the ideas about each kind of photo book you’ve been carrying in your head. Interested in writing a Travel photo book? Maybe one about your trip to Greece? Another about your trip to Iceland? Oh, and the one to Greece should include that story about missing the ferry!
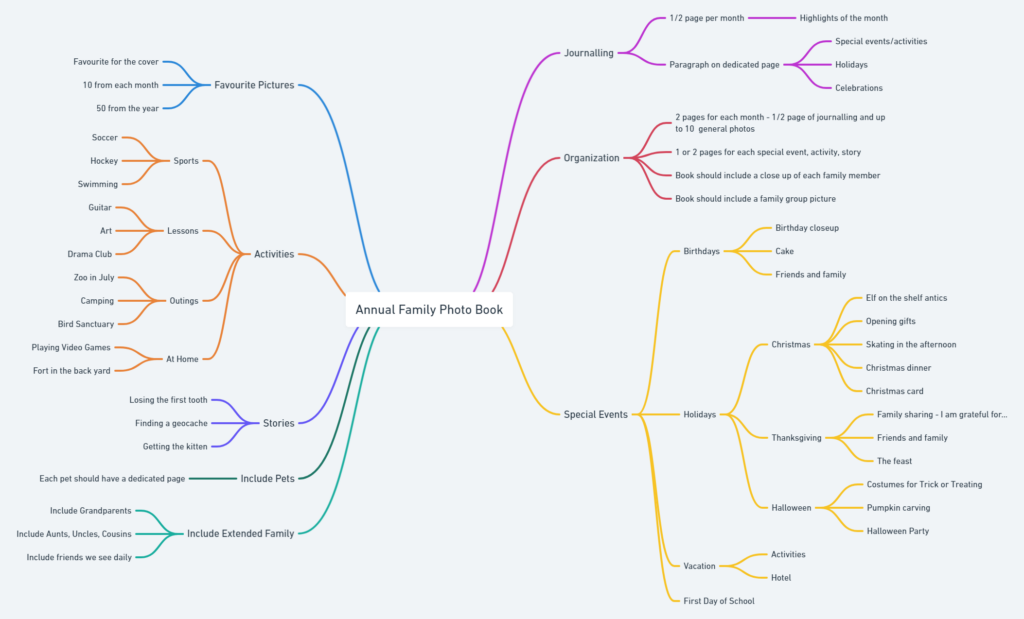
Whew! Feel better? Now we can focus on one book at a time. Pick the book you’d like to make first. Now create a mind map around that book.
What are the starting and ending points? For your trip to Greece is it the flight there and the flight home or would you like to start with some of the planning of the trip and end with the flight home? If it’s an annual family album your starting point and ending point are easy – January 1st to December 31st. Write them on your mind map.
Imagine holding your book in your hands – how do the pages look? Lots of pictures and some text to tell the stories? One beautiful picture per page? Organized by the different locations you visited? Little blocks of journaling next to the pictures or one block for each location? Write your thoughts on your mind map.
Flip through your photos from the trip. What stories do you want to include? Which picture would make a great cover for your book? Using your mind map make lists of the stories, favourite pictures, and all the activities you want to be sure to include in your book.
Add any other thoughts about your book to your mind map. Can you feel it taking shape?
Now use your mind map to write out your plan. If it’s your travel book to Greece and you’d like it organized by location than make a list of the locations you will include. List them in order. Will you have 2 pages for each location with a paragraph of text about your visit? Great! Write that down. Can you picture the pages with a lot of pictures, maybe 12, or just your 6 favourites? Write it down. Add the things you want to remember under each location – the activities, people, and special moments.
Example: Annual Photo Book Plan
Organization
- 4 pages for each month
- 1/2 page journaling for each month
- 10 – 20 pictures for each month – be sure to include activities listed below
Layout
- Layout for each month (4 pages):
- ½ page photo, ½ page journaling
- 2-8 photos on page
- Special events page or highlight Activities
- 2-8 photos on page
Plan
- 1 full page or ½ page dedicated to special events
- Birthdays – January, March, April, November
- Halloween – October
- Thanksgiving – October
- Pets – 1/2 page each – November
- First day of school – September
- 2 extra pages for Christmas – December
- 2 extra pages for Vacation – July
- Include these Activities on monthly pages:
- Hockey – January
- Guitar – February
- Bird Sanctuary – March
- Drama Club – April
- Playing Video Games – May
- Soccer – June
- Finding the geocache – June
- Zoo – July
- Camping – August
- Fort in the Backyard – August
- Getting the kitten – September
- Swimming – October
- Art – November
- Losing first tooth – November
- Family photo shoot – December
Check
- Check I’ve included all grandparents, aunts, uncles, cousins, family friends
- Check I’ve included a close up of each of us
- Check I’ve included a family group shot
- Check I’ve included photos of all the activities listed
Now follow your plan. For your book about your trip to Greece you’ve decided on 2 pages for each location with about 6 pictures and one block of text to tell the story. Create a folder just for your Greece photo book. Choose 6 pictures from each of the locations you listed and copy them to your folder. Check your plan and make sure you’ve selected pictures that highlight the memories you want to include. Start writing the text you will include in your book. Use your plan as a guide.
Oh, but then there’s Oia. Did you end up meeting those great new friends and unexpectedly spend a whole week on Oia? Did you watch the sunset and go snorkelling and take the boat across and have the fancy dinner and stay in the cave apartment and so you can’t see how to get it all down on the 2 pages you’re making for each location? No worries, now that you’ve established your format you can be flexible with it. Maybe your adventures on Oia need 4 pages. Perfect.
But uh-oh. Only have 2 pictures from when you passed through Heraklion? Maybe Heraklion doesn’t need to be a location that has 2 whole pages – maybe you have 2 pages dedicated to Crete with less text and a lot of pictures because you were moving through a lot of places quickly (um, because you spent a whole week on Oia?). Be flexible enough to let your book tell the story of your travels but be committed enough to your format to keep your book in line with your plan.
Now you are ready to finish your book! Pick a publisher. Upload your photos from your dedicated folder. Lay it out according to your plan and add the text. Edit your work. Double check your margins. That’s it! You are ready to hit the “send to print” button. With a great plan at the beginning, it will be quick work to make it to the finish line and you’ll be holding your book in your hands in no time. Now that you know the secret to finishing your photo books is to start with a solid plan, go make a photo book!